Document Actions
gvSIG-Desktop 1.10. User Manual
Alphanumeric
Exportar dfb y xls
Exporting Tables to DBF and Excel
The application allows tables (whether layer attribute tables or separate alphanumeric tables ) to be exported in two formats:
- 1.Excel: Export data to a new Microsoft Excel file. The data appears on the second row of the first sheet. The first row contains the column names.
- 2.DBF: Export data to a dBase file.
Follow these steps to export a table:
A. Select the table:
To export a table it must first be opened. The export operations are activated once the table is opened.
To export a subset of the records use the selection tools to select the records to be exported. The records can be selected either from the attribute table or by selecting the corresponding geometries in the View.
B. Select the export option
To do this select the menu option:
For Excel: Table/Export/Excel.
For Dbase: Table/Export/DBF.
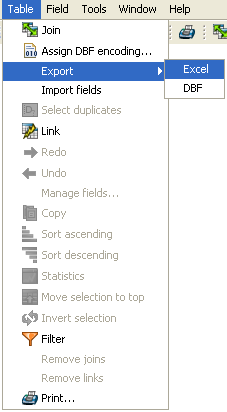
Export to Excel
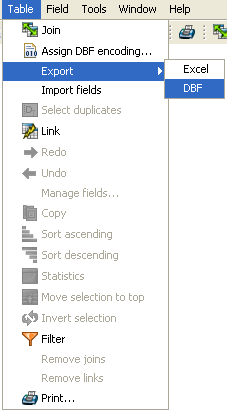
Export to DBF
C. Enter the file name
Locate the directory where you want to create the file and type a name for the file. If the file already exists the application will ask for confirmation to overwrite it.
Unión de Tablas
The tool for joining tables has been improved and now reflects the relationship between the tables once they have been joined. The operation of the tool remains the same in that both tables must contain a common field that will be used to join them together.

Dialog for joining tables
It is possible to add a prefix to the source table fields so that they can be easily identified in the joined table, e.g. Table1_FIELD1, Table1_FIELD2, etc. In a similar manner a prefix can also be added to the target table fields: Table2_FIELD1, Table2_FIELD2, etc.
The resulting joined table is given a title made up of the tables participating in the join, e.g. Table1 X Table2 X, or vice versa.

Result of the table join
The join between the tables can be removed by selecting 'Remove joins' from the Table menu.
- Note: A layer can't be edited once a join has been established on it and the "Start Editing" option on the layer's context menu will be disabled. To start an editing session go to the Table menu and remove the existing joins.
Join
The “Join” tool allows two tables to be joined via a common field. You can also access this tool by clicking on the following button

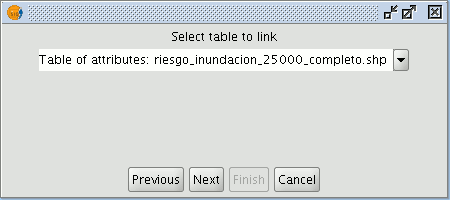
or by going to the “Table” menu and then to “Join”. To join the two tables, carry out the following steps: Firstly, specify the source table the join is to be made from.
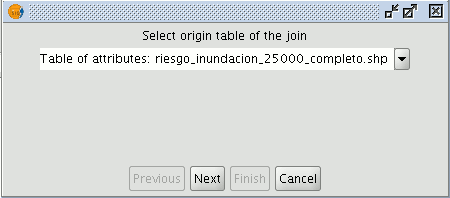
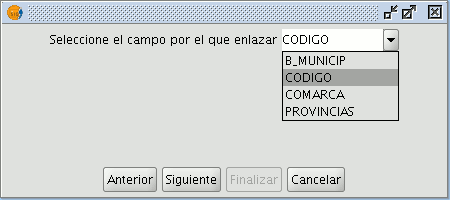
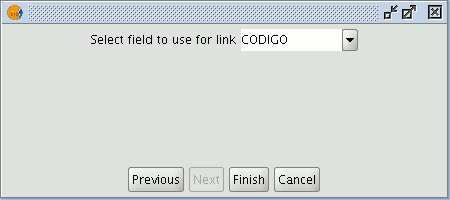
Then specify the field to be used for the join.
Then indicate the table you wish to join to the first one.
Finally, indicate the field in the second table which is common to the first one.
If you open the data source table, you will see that the fields of the destination table have been joined. The name of the field added to the table is identified by the word “Join_(Field name)”
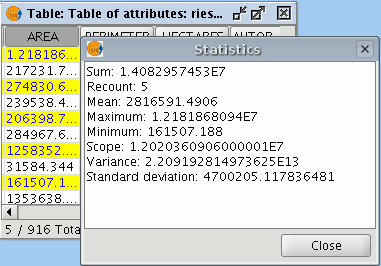
Stadistics
You can access this option by clicking on the following button

or by going to the “Table” menu and then to “Statistics”.
The “Statistics” tool allows you to obtain the most common statistical values.
N.B.: Remember that the tool will not be activated until you select a numerical field.
If you wish to obtain field statistics, select the field (left click on the field heading), then click on the “Statistics” tool.
You can only obtain statistics from a series of records, firstly, select the field the values are located in, then select the desired records, and click on the “Statistics” tool.